Construction Techniques
Micro Projects Home Page

Home

 Microprocessor Basics

There are several ways to construct Microprocessor based projects, apart from the the obvious  manufacturing of a proper PCB. Whilst the PCB might appear to be the ideal solution, in practice it is likely to be one of the worst, as by nature of the design projects undertaken by the Micro project experimenter, there are likely to be add-ons, alterations and amendments to the circuits. Obviously, when a project is completed and debugged, a PCB layout might be worth considering if a number of units are to be constructed from the original design.

Here are just three methods which may be used to construct those micro-based projects:-


Micro Basics

Site Projects

Site Projects

Construction Techniques

Construction

Programming concepts

1) Wire Wrap

I�ve used wire wrap for high speed digital circuits with no problems. wire wrapping needs a bit of experience, but is fine for micro projects, though the cost will be significantly higher than other methods (due to the special sockets required) and will be bulkier, due to the extra length of the wire-wrap pins. The typical cost of a basic wire wrapping tool (in mid-2000) is UKP 20+. wire wrap wire being very roughly UKP 8 for 100M.

With wire wrapping, a specific length of wire wrap wire is stripped off the first end of the wire, then this is wrapped around the appropriate wire wrap IC socket pin. The wire is then taken in a straight line to the pin to be connected, the end being stripped, and the wire wrapped to this. It is customary to take the most �direct� route from point to point as the back tension from the wire enables the wire wrap to be performed with the correct tension; hence the customary �birds-nest� of wires under a wire wrap board.

Software

Projects

Projects

8085 page

8085 page

Fault Finding

Fault Finding

Data Sheets

Data Sheets

EEprom Programmer

Programmer

Video Information

VIDEO info

Peripheral Circuitry

Peripheral circuitry

Central Heating and Z280's

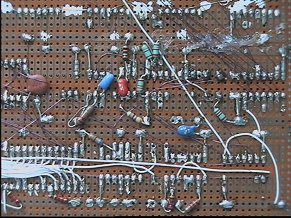
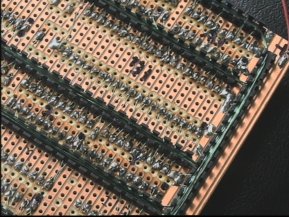
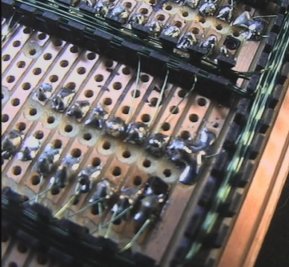
2) Wiring pen

This is the method I use for MOST of my projects, therefore I�ll be biased if asked about how easy / convenient / cost effective it is. You can use any sort of IC sockets, and copper clad board with either prototype pads or standard strips. I tend to use the standard stripboard as the prototype variants with IC pads tend to be much more expensive, and  may well waste available space if a mix of IC socket widths are to be used. The standard �Road Runner� wiring pen I use is about UKP 10, with the wire costing about the same as wire-wrap wire. As the enamel insulation  is �burned� off the wire at the time of soldering, a hot iron (400C, Weller 8-9 bit) will be needed. Note that toxic fumes are released during this operation so adequate ventilation MUST be used!!

Wire from the pen is first wrapped a few times around the chosen IC socket pin, then routed to the next via plastic castellated  strips or combs. After soldering the layout is far neater and compact than by wire wrapping, but far more difficult to correct if need be. If care is taken, it  IS possible to use the technique on simpler analog and digital designs without the use of the combs.

Other makes of wiring pens exist, all of which are used in a similar manner.

In keeping with hints about actual component layout elsewhere on this site, it is highly unlikely that there will be any issues in this area, regardless of wiring method used, AS LONG as the clock frequencies are kept down. If it is necessary to use frequencies of 40 and 50MHz on the board from an oscillator, the �live� clock runs should be kept as physically short as possible.

Z280 and  Central Heating  Controllers

Concluding Ideas

Concluding ideas

Links
Picture

Links

The picture above shows a number of different techniques all in one, but what a mess! (Yes, I own up to making it many years ago) BUT it does work. Note the original PTFE covered wire and the thin wiring pencil wire for the amendments. Components are scattered willy-nilly as required as well as Tippex and silicone rubber to secure the longer runs. You�ll notice how I have commented on but not condemmed this messy piece of work as if this is the best one can do, it shouldn�t stop that project from working!

http://www.hampshire-shops.co.uk

Picture

The picture above shows a typical example of a project wired up with the wiring pen / castellated strip method. Unfortunately not too easy to correct mistakes though...  The picture below shows another circuit with the wiring around an Intel 8088 processor.

Picture

3) Thin insulated wire.

Yes, it IS possible to wire up a micro based project using nothing more than a reel of thin, insulated wire and a piece of stripboard if this is all that there is to hand; I know, as I�ve already tried it! The results are generally a bit messy(!), and it is up to the individual if they run the wires on the top of the board amidst the IC sockets, or under the board, routing the wires carefully in between the sets of soldered IC pins, or a combination of both.  Can be very difficult to alter if errors creep into the circuit.