Site Project 1: A Z80 Digital Clock

For all 8085 fans out there, follow the construction hints shown here, then go to either a  useful Comms Test Project or perhaps the brand new SITCOM Training Computer!

Micro Projects Home Page

Home

Rule

Fancy the idea of making a PC AT Keyboard interface to use one of those cheap and easily obtainable input devices with your project? Read on! Full circuit details and software coding available here to achieve this practical and useful goal with a Motorola 6809 .

 Microprocessor Basics

Micro Basics

Site Projects

Site Projects

Construction Techniques

Construction

Programming concepts

Software

Projects

Projects

8085 page

8085 page

Picture

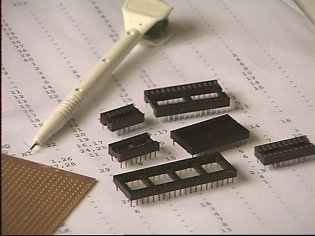
So this is where it all starts! On the left, we have a pile of bits with the appropriate documentation, and hopefully at the end of this section we�ll have a completed WORKING project!

Whilst I will be explaining MY favoured way of constructing micro based  projects, I will try and cover alternative methods in the project Construction section on the far left. and before you ask - yes, I built this all one evening JUST for this site, using the instructions I�m giving here.

And did the project work first time? No it didn�t! (see I�m being honest!!), and were there any errors in the instructions? Yes - but at least I found them and so you can rest assured that they are now 100% correct!

The strange object on the right is the end of my WIRING PEN. Several manufacturers make these as they are THE most practical way of wiring from pin to pin to pin... without breaking the chain. The wire itself is usually about 30swg or thinner with an enamelled coating. It is burnt off at the time of soldering with a hot soldering iron. Please note though that the fumes are TOXIC, so adequate ventilation is an absolute MUST during the operation.

Picture
Fault Finding

Fault Finding

Data Sheets

Data Sheets

EEprom Programmer

Programmer

Video Information

VIDEO info

The wire is stored in a small plastic reel at the other end, and is fed through the shaft to the tip at the end where it is wrapped round pins and connections, before being finally cut off by the sharp edge of the tip itself. I usually �wrap� a complete �run� before double checking the pins and connections with the wiring list BEFORE soldering, as mistakes are far far easier to recify at this stage. The wire itself is routed to the different IC�s and components via black plastic wiring COMBS or CASTELLATIONS, some pictures of which can be seen below.

Picture

Note that several different castellation widths are available - I�m not quite sure why as I generally use whatever I have at hand at the time!

So what next? I like to spend a few minutes playing around with the proposed layout on the stripboard before the actual assembly takes place with the IC SOCKETS. Yes, I ALWAYS use sockets as they make fault finding / component replacement a doddle, as opposed to a nightmare! Yes, I too have heard of faulty sockets, the last of which I saw roughly 25 years ago... What sort of sockets

Peripheral Circuitry

Peripheral circuitry

Central Heating and Z280's

Z280 and  Central Heating  Controllers

Concluding Ideas

Concluding ideas

Links

do I personally use then? Why, the cheapest of course! No, seriously, the tin-plate are generally the cheapest, and in my experience have been 100% reliable - BUT are no good for regular insertion / replacement such as in a prom programmer as the IC legs tend to �stick� and eventually begin to pull the contacts out of the holder. For this useage  I would probably recommend a turned pin type. You�ll no doubt notice that this project uses several different types!

So onto the layout. Using the example alongside as my �preferred� way, you�ll see that the stripboard tracks run �North South� with like- width sockets in the same rows. Using a small drill bit or proper stripboard cutter,  cut a complete horizontal row of �cuts� between each horizontal row of sockets. I like to leave 4-5 spare rows myself, to allow for soldering and the wiring combs. Study the pictures carefully if you are at all unsure. DONT (big don�t) neglect to DOUBLE CHECK that all of the cuts are 100% PERFECT. I can�t remember how many hours I once spent in locating the finest whisker of a remaining track - imagine if it had been invisible under one of the wiring combs!

Picture

Links

http://www.hampshire-shops.co.uk

PAGE 2